区块链共识机制 - POW 工作量证明 Proof Of Work 学习
工作量证明PoW(Proof of Work),通过算力的比拼来选取一个节点,由该节点决定下一轮共识的区块内容(记账权)。PoW要求节点消耗自身算力尝试不同的随机数(nonce),从而寻找符合算力难度要求的哈希值,不断重复尝试不同随机数直到找到符合要求为止,此过程称为“挖矿”。具体的流程如下图:
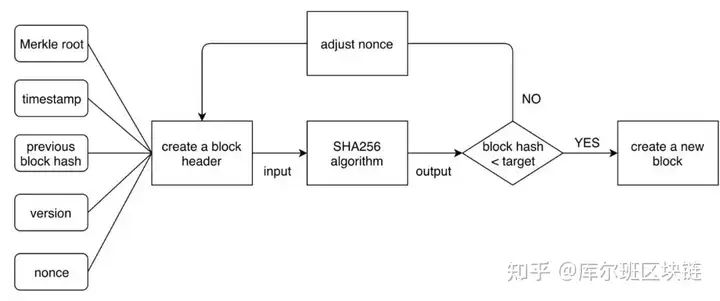
第一个找到合适的nonce的节点获得记账权。节点生成新区块后广播给其他节点,其他节点对此区块进行验证,若通过验证则接受该区块,完成本轮共识,否则拒绝该区块,继续寻找合适的nonce。
来自–一文读懂主流共识机制:PoW、PoS和DPoS - 知乎 (zhihu.com)
这里通过NodeJs来实现–程序员来讲讲什么是区块链 | 小白也能听懂的通俗解释 | 区块链原理 | 比特币 | 数字货币_哔哩哔哩_bilibili
1、简易区块链搭建
区块链,顾名思义是由一个个区块相连接而成组成的链式结构
所以我们先定义Chain和Block类
1
2
3
4
5
6
7
8
9
10
11
12
13
14
15
16
17
18
19
20
21
22
23
24
25
26
27
28
29
30
31
32
33
34
| const sha256 = require('crypto-js/sha256')
class Block{
constructor(data, preHash){
this.data = data
this.preHash = preHash
this.hash = this.computeHash()
}
computeHash() {
return sha256(
this.data +
this.preHash
).toString()
}
}
class Chain{
constructor(){
this.chain = [this.makeGenesis()]
}
makeGenesis(){
return new Block('Origin','')
}
}
const fanChain = new Chain()
const block1 = new Block('b1', '111')
console.log(fanChain)
console.log(block1)
|
运行得:
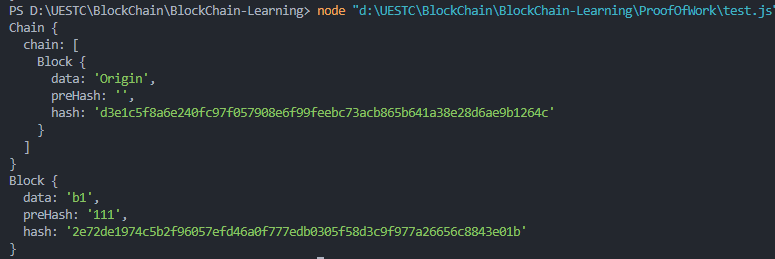
此时链上只有起始区块
那要把我们定义的block1加到fanChain上,就要在chain上构造相应方法
1
2
3
4
5
6
7
8
9
10
11
12
13
14
15
16
17
18
19
20
21
22
23
|
getLatestBlock() {
return this.chain[this.chain.length - 1]
}
addBlock(newBlock) {
newBlock.preHash = this.getLatestBlock().hash
newBlock.hash = newBlock.computeHash()
this.chain.push(newBlock)
}
const fanChain = new Chain()
const block1 = new Block('b1', '111')
const block2 = new Block('b2', '2')
fanChain.addBlock(block1)
fanChain.addBlock(block2)
console.log(fanChain)
|
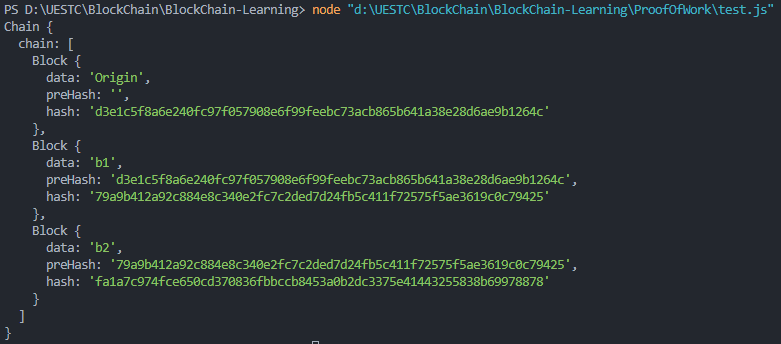
可以看到:
b1的preHash与上一个区块Origin的hash一致b2的preHash与上一个区块b1的hash一致- 成功链接
这时候需要考虑一个问题,因为区块链具有不可篡改性
但是如果我们直接通过fanChain.chain[1].data = 'fake'进行更改data数据
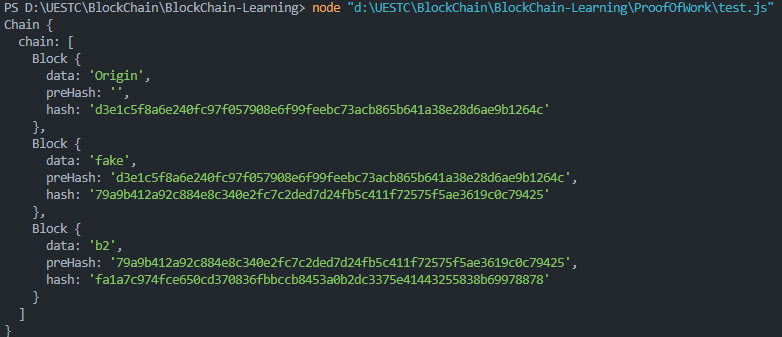
会发现b1的数据被篡改了,但是hash依旧不变,所以我们要对链中的区块增加校验过程
校验要进行的过程有:
- 对比
Block上储存的hash(也就是刚创建区块时候的hash)与通过当前Block数据再次生成的hash,以判断区块的data有没有被篡改 - 上一个区块的
hash与当前区块的preHash是否一致,也就是是否构成链式结构
1
2
3
4
5
6
7
8
9
10
11
12
13
14
15
16
17
18
19
20
21
22
23
24
25
26
27
28
29
30
31
32
33
34
35
|
validateChain() {
if (this.chain.length === 1) {
if (this.chain[0].hash !== this.chain[0].computeHash()) return false
return true
}
for (let i = 1; i < this.chain.length; i++) {
const blockToValidate = this.chain[i]
if (blockToValidate.hash !== blockToValidate.computeHash()) return false
const preBlock = this.chain[i - 1]
if (preBlock.hash !== blockToValidate.preHash) return false
}
return true
}
const fanChain = new Chain()
const block1 = new Block('b1', '111')
const block2 = new Block('b2', '2')
fanChain.addBlock(block1)
fanChain.addBlock(block2)
console.log(fanChain.validateChain())
fanChain.chain[1].data = 'fake'
console.log(fanChain.validateChain())
console.log(fanChain)
|
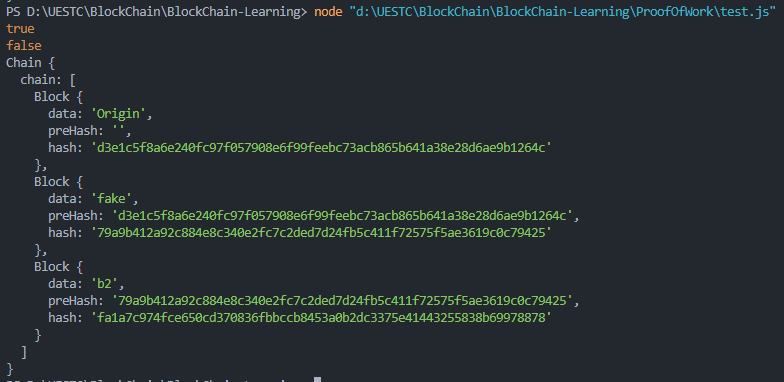
可以发现fanChain在被人工篡改之后,被校验出来了
其次,我们也可以同时篡改区块的hash
fanChain.chain[1].hash = fanChain.chain[1].computeHash()
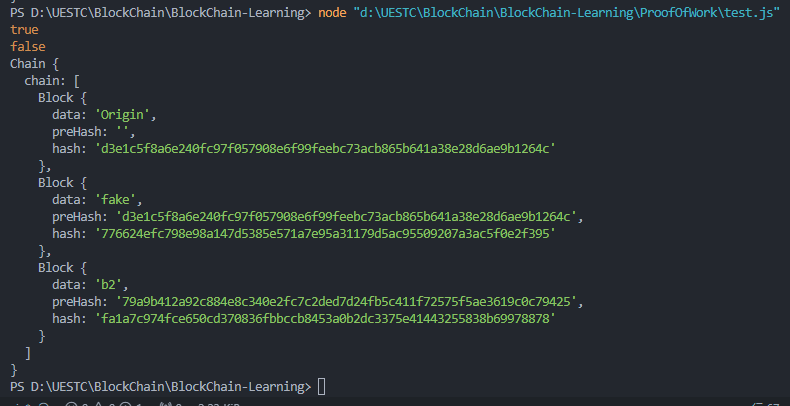
但是发现依然校验失败,这是因为b1的hash改变了,所以导致b2的preHash与b1的hash不一致了,上下无法链接
2、实现工作量证明机制
上述实现了一个简单的区块链结构,我们只要通过computeHash算出哈希值就可以把区块加到链上
但是比特币中,需要生成的hash满足特定条件,比如哈希前缀三位全为0,等…
所以如果需要满足的条件越多,需要的算力就越大
- 这里我们定义
nonce作为改变量 - 用
mine()进行穷举比对
1
2
3
4
5
6
7
8
9
10
11
12
13
14
15
16
17
18
19
20
21
22
23
24
25
26
27
28
29
30
31
32
33
34
35
36
37
38
39
40
41
42
43
44
45
46
47
48
49
50
51
52
53
54
55
56
57
58
59
|
constructor(data, preHash) {
this.data = data
this.preHash = preHash
this.nonce = 0
this.hash = this.computeHash()
}
computeHash() {
return sha256(this.data + this.nonce + this.preHash).toString()
}
getAnswer(difficulty) {
let Ans = ''
for (let u = 0; u < difficulty; u++) {
Ans += '0'
}
return Ans
}
mine(difficulty) {
while (true) {
this.hash = this.computeHash()
if (this.hash.substring(0, difficulty) === this.getAnswer(difficulty))
break
this.nonce++
}
}
constructor() {
this.chain = [this.makeGenesis()]
this.difficulty = 3
}
addBlock(newBlock) {
newBlock.preHash = this.getLatestBlock().hash
newBlock.hash = newBlock.computeHash()
newBlock.mine(this.difficulty)
this.chain.push(newBlock)
}
const fanChain = new Chain()
const block1 = new Block('b1', '111')
const block2 = new Block('b2', '2')
fanChain.addBlock(block1)
fanChain.addBlock(block2)
console.log(fanChain)
|
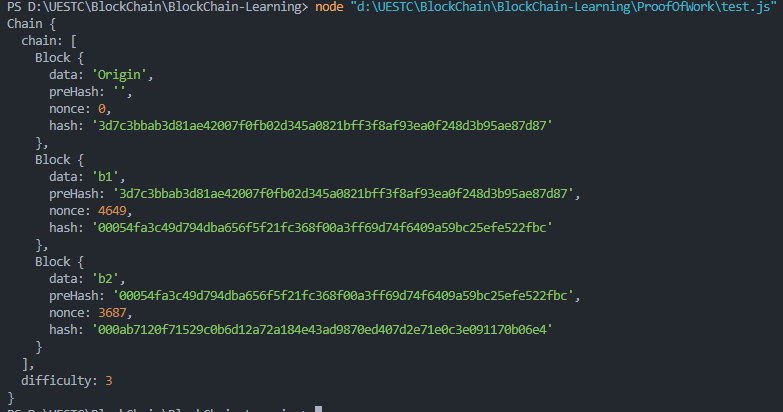
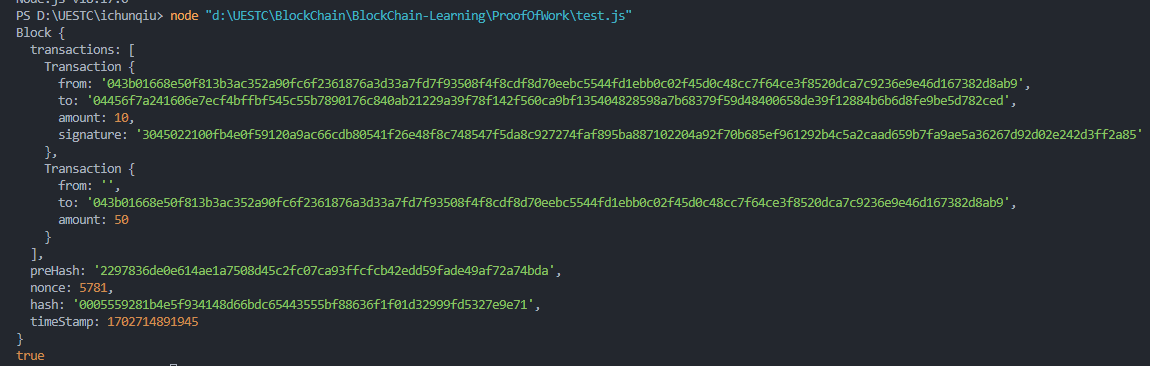
观察发现在nonce为4649和3687时得到可行的hash
3、创造自己的数字货币
既然说货币,那便是用来交易的
所以我们可以把上述的Block类中的data改变为交易内容Transaction,以实现转账
所以我们追加一个Transaction类,既然是交易,那必然包含
1
2
3
4
5
6
7
8
9
10
11
12
13
14
15
16
17
18
19
20
21
22
23
24
25
26
27
28
29
30
31
| class Transaction {
constructor(from, to, amount, timeStamp) {
this.from = from
this.to = to
this.amount = amount
this.timeStamp = timeStamp
}
computeHash() {
return sha256(this.from + this.to + this.amount + this.timeStamp ).toString()
}
}
constructor(transactions, preHash) {
this.transactions = transactions
this.preHash = preHash
this.nonce = 0
this.hash = this.computeHash()
}
computeHash() {
return sha256(
JSON.stringify(this.transactions) +
this.preHash +
this.nonce
).toString()
}
|
但是上述的时间戳timeStamp在比特币作者的论文里,是要在block中进行生成的,而不是在Transaction,所以进行修改
1
2
3
4
5
6
7
8
9
10
11
12
13
14
15
16
17
18
19
20
21
22
23
24
25
26
27
28
29
30
31
32
33
| class Transaction {
constructor(from, to, amount, timeStamp) {
this.from = from
this.to = to
this.amount = amount
}
computeHash() {
return sha256(this.from + this.to + this.amount ).toString()
}
}
constructor(transactions, preHash) {
this.transactions = transactions
this.preHash = preHash
this.nonce = 0
this.hash = this.computeHash()
this.timeStamp = Date.now()
}
computeHash() {
return sha256(
JSON.stringify(this.transactions) +
this.preHash +
this.nonce +
this.timeStamp
).toString()
}
|
上面写道把data改为Transaction交易数据
所以现在的这个区块链相当于一个池子(TransactionPool)装满了交易(Transaction)
1
2
3
4
5
6
7
8
|
constructor() {
this.chain = [this.makeGenesis()]
this.difficulty = 3
this.transactionPool = []
this.minerReward = 50
}
|
这时候我们回到先前的addBlock
1
2
3
4
5
6
7
8
9
|
addBlock(newBlock) {
newBlock.preHash = this.getLatestBlock().hash
newBlock.hash = newBlock.computeHash()
newBlock.mine(this.difficulty)
this.chain.push(newBlock)
}
|
这个方法实际上是为了我们调试用的,实际运用中并不能直接增加
实际中,我们是在慢慢的挖区块,这里假定有个矿工在帮我们挖矿,当他挖到区块链便会获得相应的矿工奖励,奖励的发放依然通过Transaction来发放
1
2
3
4
5
6
7
8
9
10
11
12
13
14
15
16
17
18
19
20
21
22
23
24
25
26
27
28
29
|
mineTransactionPool(minerAddr) {
const minerTransaction = new Transaction('', minerAddr, this.minerReward)
this.transactionPool.push(minerTransaction)
const newBlock = new Block(this.transactionPool, this.getLatestBlock().hash)
newBlock.mine(this.difficulty)
this.chain.push(newBlock)
this.transactionPool = []
}
addTransaction(transaction) {
this.transactionPool.push(transaction)
}
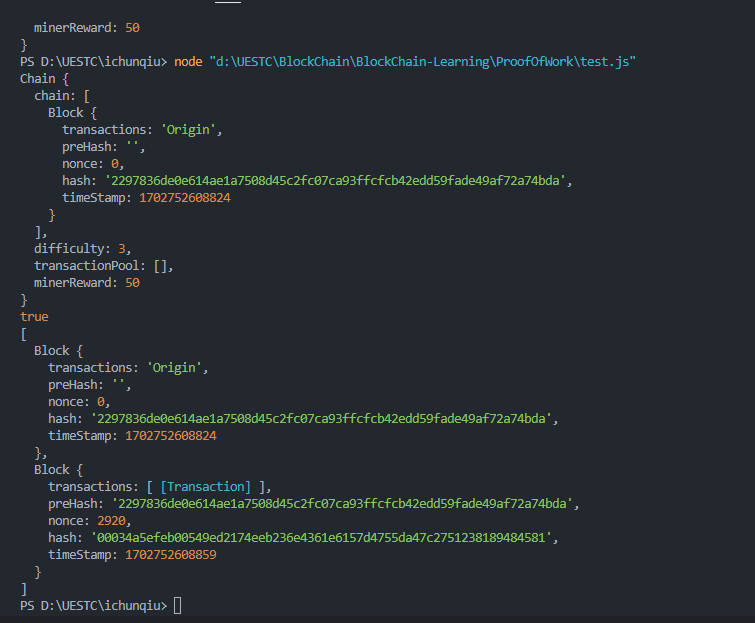
const fanCoin = new Chain()
const t1 = new Transaction('addr1', 'addr2', 10)
const t2 = new Transaction('addr2', 'addr1', 20)
fanCoin.addTransaction(t1)
fanCoin.addTransaction(t2)
fanCoin.mineTransactionPool('fan')
console.log(fanCoin)
console.log(fanCoin.chain[1].transactions)
|
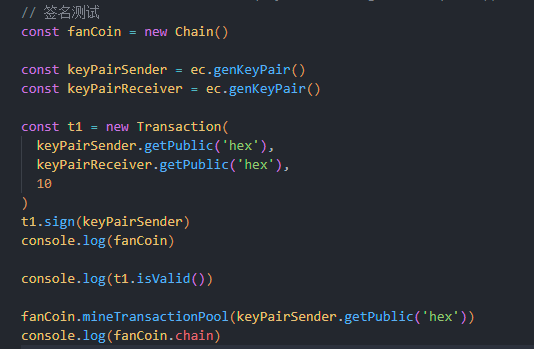
4、数字签名
上节我们实现了简易的数字货币,但是可以发现Transaction(交易)可以由任何人发起,而且也可以不经过你的批准而使用你钱包的钱,这显然不行,怎么能动我的小金库
所以在发起转账前,需要做出相应的验证措施,这就要用到了本节的数字签名
这里我们使用的是非对称加密
- 通过公开
Transaction,Public Key与Signature,可以让其他所有人校验这个签名的合法性,证明这个交易属于你 - 同时,只有验证通过才能执行转账操作,
保护了你的小金库
1
2
3
4
5
6
7
8
9
10
11
12
13
14
15
16
17
18
19
20
21
22
23
24
25
26
27
28
29
30
31
32
33
34
35
36
37
38
39
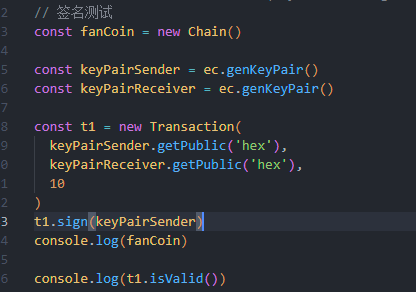
| const ecLib = require('elliptic').ec
const ec = new ecLib('secp256k1')
constructor(from, to, amount) {
this.from = from
this.to = to
this.amount = amount
}
sign(key) {
this.signature = key.sign(this.computeHash(), 'base64').toDER('hex')
}
isValid() {
if (this.from === '') return true
const keyObj = ec.keyFromPublic(this.from, 'hex')
return keyObj.verify(this.computeHash(), this.signature)
}
addTransaction(transaction) {
if (!transaction.isValid())
throw new Error('Found InValid Transaction before adding to pool!')
this.transactionPool.push(transaction)
}
|
可以看到验证成功,现在我们手动篡改一下,尝试一下
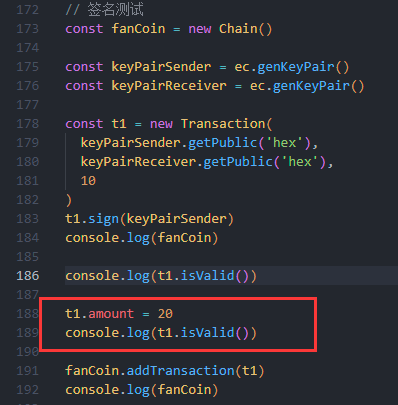
把amount改成20
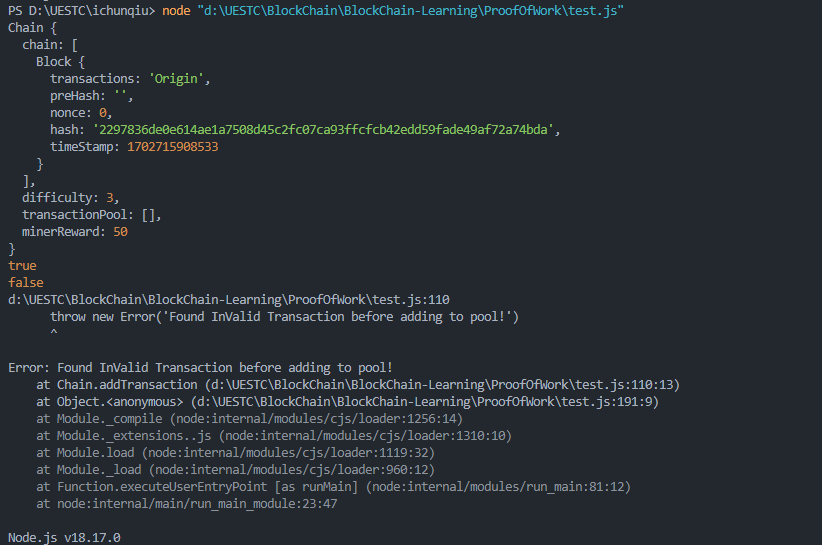
可以看到输出了false,并丢出来错误,且并没有往Transactions中放入错误的交易
这时候,在之前验证区块是否一一相连时,我们也应该加上验证
由于区块中可能有多个Transaction,所以采用穷举依次验证
1
2
3
4
5
6
7
8
9
10
11
12
13
14
15
16
17
18
19
20
21
22
23
24
|
validateTransaction() {
for (const transaction of this.transactions) {
if (!transaction.isValid)
return false
}
return true
}
mine(difficulty) {
this.validateTransaction()
while (true) {
this.hash = this.computeHash()
if (this.hash.substring(0, difficulty) === this.getAnswer(difficulty))
break
this.nonce++
}
}
|
1
2
3
4
5
6
7
8
9
10
11
12
13
14
15
16
17
18
19
20
21
22
23
24
|
validateChain() {
if (this.chain.length === 1) {
if (this.chain[0].hash !== this.chain[0].computeHash()) return false
return true
}
for (let i = 1; i < this.chain.length; i++) {
if (!this.chain[i].validateTransaction())
throw new Error('Found InValid Transaction while validating Chain')
const blockToValidate = this.chain[i]
if (blockToValidate.hash !== blockToValidate.computeHash()) return false
const preBlock = this.chain[i - 1]
if (preBlock.hash !== blockToValidate.preHash) return false
}
return true
}
|
The End